Say hello to your new best friend in the last-minute-gift-giving department: the Key Pouch. This project is...
- quick to sew
- fabulous for fussy cutting
- economical -- all the pieces are fairly small (get out those scrap buckets!) and no interfacing needed
- adaptable to any age, gender, or occasion according to your fabric choices
- easily upgraded with the addition of a gift card in one of the front pockets
Materials:
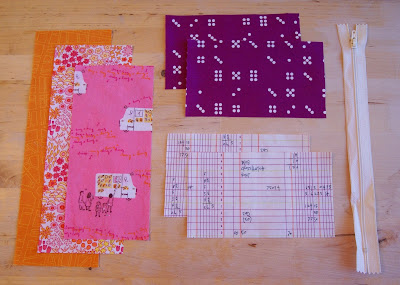
(1) 3 1/2 x 7 1/2" rectangle for small front pocket
(1) 3 1/2 x 8 1/2" rectangle for medium middle pocket
(1) 3 1/2 x 9 1/2" rectangle for large back pocket
(2) 3 1/2 x 6" rectangles for zipper pouch exterior
(2) 3 1/2 x 6" rectangles for zipper pouch lining
(1) 1/2 x 2" piece of twill tape (not pictured)
(1) zipper, 7" or longer
Step 1: Take the three rectangles for the outer pockets and fold them in half, wrong sides of fabric together, so that the short ends meet. Topstitch each piece 1/4" below the fold.
Step 2: Stack the outer pockets in place on top of one of the zipper pouch exterior rectangles, making sure that the pockets line up in the correct order from small to large (see photo above). Fold the twill tape in half and stitch 1/8" from the raw ends to hold them together. Place the twill tape on the left side of the stack just above the large back pocket with the raw edges toward the left side (again, see photo).
Baste the entire stack together 1/8" from the edge around the sides and bottom to hold everything in place.
Step 3: Now that your front exterior piece is assembled, sew this together like a basic zipper pouch. Stack in this order from bottom to top, lining everything up on the right edge: front zipper pouch exterior piece with pockets, zipper (face down with pull at the top), zipper pouch lining piece.
Sew 1/4" from the edge and press the fabric back from the zipper so that the wrong sides of the fabric are touching.
Repeat with the other zipper pouch exterior and lining pieces on the other side of the zipper.
Step 4: Unzip the zipper part way (do NOT forget to do this!) and then place the exterior pieces with right sides together and the lining pieces with right sides together (see picture below), clipping or pinning them in place. Make sure that the teeth of your zipper are pointed toward the exterior end of the pouch.
Step 5: Starting at the bottom corner of the pouch lining, sew 1/4" from the edge all the way around the lining, exterior, and back around just past the other corner of the lining (see photo above), leaving a gap in the lining for turning and backstitching at both ends.
Clip the corners and trim off the edges of the zipper.
Step 6: Reach in through the lining and turn the bag right side out through the zipper. Poke out the corners of the pouch with a chop stick or turning tool and press it with your iron. Tuck the raw edges into the hole in your lining, press, and sew 1/8"-1/16" from the bottom edge of the lining to stitch it closed.
Step 7: Tuck the lining into the pouch, press your bag one more time, and you're ready to go!
Happy sewing!


